This page is for ramblings, technical data
and the odd photo. There is no order to this info and the info
would be considered arcane by many.
So who might be interested in doing this?
Well if you have a system that just won't run well enough at
higher speeds then this would help. You might not have to have a
direct connection between the CPU and the Evaporator. Just
putting your parts into the fridge will result in lower temps
across the board. If you didn't have desiccant you could just try
to control the dripping from the evap. If you use this method
monitor the inside air temp and keep the fridge air tight. Then
don't open the case until inside and out side are at the same
temp. That way you won't have condensation occurring on computer
equipment. If you do open the case when parts are still cold then
use a fan to keep air moving inside the case, bigger the fan the
better.
I think any extreme
overclocker will be considering this. If your an overclocker on a
budget then this is a much better route than the Kyrotech unit.
If you have lots of money then you might go for something like a
Kyrotech unit but it will still be noisy and have all the cooling
problems your current set up has except for the CPU.
Cost so far in American $:
Fridge $165, bought it brand new as a
scratched, floor demo unit. The salesman though it was a bit odd
that I brought an indoor/outdoor thermometer to test the evap
temp.
Heat sink material. About $50 for 2 or 3 ft
of 1.4"X4" bus bar.
Desiccant. Only a couple of dollars worth
are required, getting it in small amounts seems the difficult
part.
Odds and ends. Well thats hard to say but
no more than $50. The insulation material is from the garbage
dump, duct tape is about $2 a roll.
You already have all the computer parts, so
don't be afraid to take a hacksaw to your case to accomplish
this.
So you can acheive these results with less
than $300.
These are just general and
rambling notes on project kool, written at the end of 'stage 1'
and late at night:)
-Initial tests indicate that the mini-bar fridge may be
undersized for this job, but until the total evaporator temp
cannot be held down (by the compressor) the experiment will
continue with this model. Danby Model DCR080WEY-7 using 134a, min
evaporator (evap) temp about -25c.
-the door is just 2" SM
Styrofoam duct taped to the fridge.
-Operation at 374 is possible but not reliable. Win95 is good
enough and I've run at 374MHz for as long as an hour but WinNT
seems fussy. I haven't spent too much time at getting 374MHz to
run well because I'm working on temps at this point. Once I get
the temperatures and the control I want then I'll start working
on the extreme overclocking. For now I use 83MHz bus and 333MHz
CPU.
-Boot at 400MHz not successful.
-Boot at 350MHz with 100MHZ bus speed successful!!!!. Got into
WIn95 and WOW was that fast. Hard drive was first to die. Did not
run wintune as system completely crashed. Win95 must now be
reloaded due to major file corruption's. Was running a movie for
over 15secs before crash. I guess I should have just shut it down
but hey it was fun while it lasted:) It looks like I can have
100MHz bus if I can keep air temp down and hdd cool, but I won't
get my hopes up yet or spend too much time on it, esp since my
next system will be a 100MHz K6.
After the first set up I determined that, I'll have
to increase the thickness to increase the quantity or volume (to
allow more heat to flow). That got me thinking if I had an
infinite thick piece what temp difference could I expect? The
evap could consume more heat and a low CPU temp would depend on
the heat flowing from the CPU to the evap. For now I'll just
assume a perfect evap to heat sink connection. So this rate of
heat flow through the AL would have some measurement and it would
be different for different materials.
Then I asked myself 'why use AL?' only because
thats what most heat sinks are made off, thats why. No other
reason. Just because everybody else does something doesn't mean I
have to do it that way. So I try to find some books on
metals and come across Machinery's Handbook25. This very American
book has a section on properties of materials. Here's some of the
info from it.
AL (aluminum) #13 26.9815
CU (copper) #29 63.546
FE (iron) #26 55.847
AG (silver) #47 107.868 (heavy stuff)
Specific Heat, ratio of heat required to raise 1 cubic inch one
degree F compared to water.
AL 0.214
CU 0.094
AG 0.056
Iron 0.110 So if I understand
this correctly it means that AL will be the most resistant to
temp change. It will be able to 'absorb' heat better than AG
which would raise (or lower) quickly to temp changes. The
difference between AL and CU is about 2. AL is twice as good at
(slowing) temp response. I think of this as thermal density with
AG not being as thermally dense as AL.
Coefficients of heat transmission, Heat transmitted in BTU (damn
British, they go and mix a modern and an old obsolete measurement
system and come up with BTU) per second through metal 1"
thick, per square inch of surface for a temp difference of 1
degree F.
AL 0.00203
CU 0.00404
AG 0.00610
FE
0.00089 So this is what
measures the 'flow rate' I was thinking of. This means that Iron
is a poor transmitter of heat, practically an insulator compared
to Silver. CU is twice as good at transmitting heat compared to
AL.
Coefficients of Heat Radiation. None of the metals I'm interested
in are on this list. I don't know where to get the info off the
net so may have to get this info next trip to city. I don't think
I'll need it as it would most likely refer to black body
radiation which I'm not using here. It might answer why AL is
normally used for heat sinks.
So now I am thinking, how can I use both the
AL for its "thermal density" and the copper for its
heat flow. The AL is twice as thick. Does this make up for the
1/2 as good flow rate? I don't think so because I have such a
small point from which to move the heat. I think I'll make the
new and improved heat sink out of copper. It will cover a much
larger part of the evap and just above the PII (or at some point)
I'll bolt on a chunk of AL to offer a bit of 'thermal density'. I
also plan to add insulation to the heat sink so there are fewer
losses to the air. I'll use a fan on the exposed part of the evap
to cool the internal air. Then test it all over again to see what
changes have occurred. Once I get a stable set up with temps well
below 0 then I can start using and testing the computer.
2ND HEAT SINK CONFIG:
So I left the PS inside. I want this thing to
be quiet and putting a noisy PS out side would defeat that.
Door is now 2" SM and better sealed.
Tray of desiccant is being used to control
condensation.
Heat sink is now 1/4" CU flat bar 4"
wide, and in an L shape to increase the surface area in contact
with the evap.
Mounted PII boxed heat sink to evap, to
transfer more heat from air.
Added extra insulation on one wall inside
fridge.
RESULT:
System has now achieved it's desired result.
On the second heat sink config I have a system that will run (or
should run if I would quit crashing the OS) at 333MHz @83MHz nice
and quiet. But my secondary objective is to get the CPU at
375MHz, even if it is only for some testing. 100MHZ bus would be
nice but it takes alot of work as the system will boot, load the
OS and then crash taking the OS with it. Reinstalling the OS for
each 30secs of use is not making 100MHz bus worth the effort. Of
course I keep trying and as a result my OS is a mess, both WinNT
and 95 kick me out and shut down the computer.
The copper does seem to work better than the
AL but then I haven't made a direct comparison because I do not
have very much AL to work with. The next config might be a U
shaped, or an upside down h. That way I can clamp a chunk of CU
to each side of the evap. This will not increase the surface area
(well it might a bit) but will improve the connection to the CPU
of the extra CU.
I plan on making and attaching a a large heat
sink, made of AL, to the evap so I can cool the air temp down.
I'll have to cut a few fins into it but that won't be too hard. I
have a 4" fan I can use but I want it to be 120volt so it
will keep the inside cool all the time. That should help with the
100MHz bus and help keep CPU cool as well. I should be able to
get air temps of -10c but won't know until I try.
The door will wait. For now taping
Styrofoam to the front works just fine. I may also have to have
the door extend further out with the K6 socket seven set up.
I now have 6 radio shack
thermometers so can work on video card and hdd temps.
97/02/14 5th generation
stage 1.
Temps from latest test: 6 points
are monitored. The internal air temp, the video card heat sink,
the surface of the hard drive, the CPU, upper heat sink, and the
evap.
The Video card is a Diamond
stealth 3400xl with a home made heat sink attached to the chip.
It is this heat sink that is monitored.
The CPU temp is taken from the
surface of the copper heat sink in the middle at the bottom.
The upper Heat Sink is taken near
the top of the copper under the insulation, not between the
copper ad evap.
The evap temp is actually the exit
temp taken at the last section of evap tube. This is the temp of
the gas being sent back to the compressor.
Time
/Air /video /HDD / CPU
/HS /Evap
0
-19.0 -19.4
-18.0 -23.7
-25.8 -22.0
5min
-16.6 -13.3
-15.3 -17.0 -22.7
-19.9 fan off
12mn
-12.1 -1.4
-09.9 -09.8 -18.0
-02.1
17mn
-09.7 +02.0
-07.0 -06.6 -15.7
-19.6
24mn
-06.4 +06.5 -02.9
-03.6
-12.9 -17.6
34mn
-01.9 +10.7 +01.8
-04.5
-11.0 -15.3
42mn
0000 +12.3 +03.9
-10.9
-16.8 -15.5
1:05
+02.8 +15.2
+07.5 -09.9 -16.3
-14.0
1:10
+03.3 +15.8
+08.1 -10.2 -16.0
-14.5
1:38
+05.4 +18.4
+10.5 -08.5 -14.4
-12.8
1:42
+05.5 +18.4 +10.7
-08.5
-14.4 -12.0
2:30
+07.6 +20.3
+13.0 -06.4 -12.5
-11.8
3:05
+08.5 +21.3 +13.8
-06.5
-12.3 -11.3
6:00
+07.5 +19.8 +13.0
-08.7
-13.9 -11.9
CPU temp settles out around -12 to
-10, even without a fan on the video card it settles out around
20c, which is great because it was over 40c with a fan when I had
a regular
case..
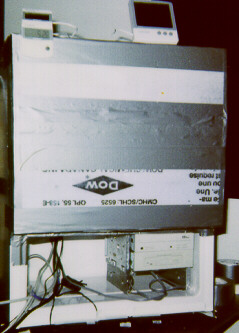 This shows the front. It is hard to see but there
are several thermometers at the bottom and top. The CD-ROM drive
and the diskette drive can be seen at the bottom. If I was to
make a door I would use an O-Ring to seal the door and have the
bottom enclosed, with connectors, like the back of your current
computer.
This shows the front. It is hard to see but there
are several thermometers at the bottom and top. The CD-ROM drive
and the diskette drive can be seen at the bottom. If I was to
make a door I would use an O-Ring to seal the door and have the
bottom enclosed, with connectors, like the back of your current
computer.
Back to Project Kool